Introduction
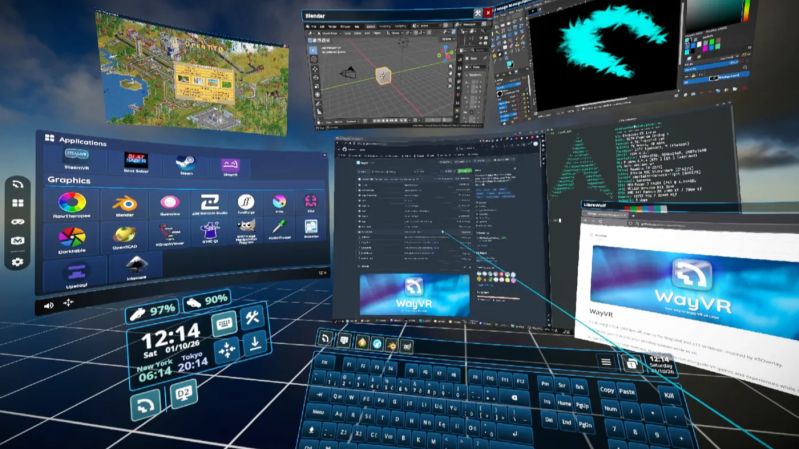
If you're using Linux and want to take your virtual reality experience beyond just gaming or watching media, WayVR is a game-changer. This open-source project allows you to control your desktop and launch applications directly from within a VR headset. Instead of treating your headset as a secondary monitor that merely receives output from a running VR app, WayVR turns it into a full-fledged interaction tool. You can click, type, and navigate your computer as if you were sitting in front of it—all while immersed in virtual space. This guide will walk you through setting up WayVR on your Linux system, from gathering the necessary components to customizing your workflow for maximum productivity and fun.

What You Need
Before diving into the steps, make sure you have the following prerequisites:
- A compatible VR headset – Standalone headsets like Oculus Quest/Quest 2 or HTC Vive Focus 3 work best. PC-tethered headsets may also work with additional configuration.
- Linux distribution – WayVR supports most modern distros; Ubuntu 22.04+, Fedora 36+, or Arch Linux are recommended.
- WiVRn – This is used to stream VR applications from your Linux PC to your standalone headset. Install it first.
- WayVR software – The core package that enables desktop interaction within VR.
- Basic command-line knowledge – You'll need to run a few terminal commands for installation and configuration.
- VR controllers – These are essential for interacting with your desktop in VR.
- Good Wi-Fi network – A stable 5 GHz connection ensures smooth streaming and low latency.
Step-by-Step Setup Guide
Step 1: Prepare Your Linux System
Before installing anything, update your system packages. Open a terminal and run:
sudo apt update && sudo apt upgrade -y   # Debian/Ubuntu
sudo dnf update -y                       # Fedora
sudo pacman -Syu                         # Arch
Then install essential build tools and dependencies:
sudo apt install git cmake gcc g++ # Example for Ubuntu; adjust for your distroEnsure your graphics drivers are up to date (NVIDIA or AMD). For NVIDIA, install the proprietary driver; for Intel/AMD, the open-source Mesa driver works fine.
Step 2: Install WiVRn
WiVRn provides the critical link between your Linux PC and your standalone headset. It streams VR applications (including WayVR) over the network. Follow the official WiVRn GitHub page for detailed installation instructions. Typically, you'll clone the repo, install dependencies, and compile:
git clone https://github.com/WiVRn/WiVRn.git
cd WiVRn
mkdir build && cd build
cmake ..
make -j$(nproc)
sudo make install
After installation, start the WiVRn service (or add it to your startup applications). Ensure your headset is on the same network.
Step 3: Install WayVR
With WiVRn ready, now get WayVR. Again, visit the WayVR repository for the latest. The general steps are:
git clone https://github.com/WayVR/wayvr.git
cd wayvr
mkdir build && cd build
cmake ..
make -j$(nproc)
sudo make install
Some distributions may have packages in community repositories. For example, on Arch Linux you can use an AUR helper: yay -S wayvr. Check your distro's wiki.
Step 4: Configure WiVRn and WayVR
Both projects use configuration files. For WiVRn, edit ~/.config/wivrn/config.toml to set your headset's IP address and streaming parameters (e.g., bitrate, resolution). For WayVR, create or edit ~/.config/wayvr/config.yaml. A basic example:
desktop:
  resolution: [1920, 1080]
  fps: 60
launcher:
  enable: true
This sets your virtual desktop resolution and enables the app launcher inside VR. Save the file.
Step 5: Launch the System
Start WiVRn on your PC (if not already running):
wivrn-serverOn your standalone headset, open the WiVRn client app (available via SideQuest or the official store) and connect to your PC. You should see your Linux desktop streamed into the headset. Then launch WayVR from the terminal:
wayvrYour VR controllers will now be able to interact with the desktop screen floating in front of you. Use the controller's trigger to click, thumbstick to scroll, and grab buttons to move windows.
Step 6: Navigate and Launch Applications
Inside WayVR, you'll see your familiar Linux desktop. To launch programs: point your controller at a launcher icon and pull the trigger. To type: use a virtual keyboard that appears when text fields are selected, or pair a Bluetooth keyboard. To switch workspaces: use gestures or dedicated buttons. The interface is highly customizable—experiment with the settings menu to adjust pointer speed, button mappings, and more.
Step 7: Fine-Tune for Performance and Comfort
Streaming over Wi-Fi can introduce latency. Optimize by:
- Reducing streaming resolution in WiVRn config (e.g., 1500x900 instead of 1920x1080).
- Lowering the frame rate to 30 or 45 fps if your headset supports asynchronous timewarp.
- Ensuring a strong 5 GHz connection with minimal interference.
- Closing unnecessary background applications on your PC.
For comfort, adjust the virtual screen distance and size using WayVR's settings. Taking frequent breaks is recommended to avoid eye strain.
Tips for Getting the Most Out of WayVR
- Experiment with text input: Try voice-to-text or a one-handed chorded keyboard if you dislike the on-screen keyboard—VR is still evolving in this area, and DIY solutions are welcome.
- Use multiple virtual monitors – WayVR can display multiple desktops simultaneously, great for multitasking in VR.
- Explore DIY headset integration – If you built your own headset (e.g., using a smartphone and FreePIE), WayVR can still work via a virtual monitor setup.
- Join the community – Both WayVR and WiVRn have active Discord channels where users share configuration tips and custom scripts.
- Automate startup – Add WiVRn and WayVR to your desktop environment's autostart list so they launch automatically when you put on your headset.
With these steps, you've transformed your Linux VR setup from a mere streaming tool into a full desktop replacement. Enjoy the freedom of working, coding, or browsing from inside your virtual space—and don't forget to have fun customizing every aspect!